
I’ve been trying to get a better toolchain + build system going for ESP32 boards. I prefer working with JetBrains IDEs and I like where I can just use the shortcuts to work with the device directly. I’ve been using M5Stack Core 2 for AWS development kit to create a device for my door while simultaneously learning how to prepare for scale using AWS IoT.
The official AWS Edukit tutorials rely on a toolchain package called PlatformIO. The latter is a grea tool but feels clunky especially since it’s a extension built for VSCode. I prefer a good understanding of the toolchain I am working with and good use of the terminal. So here’re the steps I took to use ESP32 on CLion on Apple Macbook Pro M1.
The esp-idf system itself can be installed on arm64 (Apple Silicon), however the library for Microchip ATECC608A cannot be built for arm64. I opened a new feature request with Microchip but don’t have high hopes this will be addressed soon. But fortunately we can still install x86 packages on Apple Macs using Rosetta2.
Step 1
Setup multiple versions of Mac Homebrew
Start by installing x86 Mac homebrew for dependencies. I like to have both versions (arm64 & x86) on my machine because I prefer to do other development (React-Native etc.) on the much faster arm64 environment. The best way, I’ve found, is to use an entire x86 terminal.
Once rosetta2 is installed. Start a new terminal. I use ZSH with oh-my-zsh so the command becomes arch --x86_64 zsh. If you check the output of the arch command, it tells us exactly what architecture the terminal is running on.
In this case, once the command is executed, I see either i386 or arm64. Obviously, when you are working with arm64 you’ll want to work with compatible packages.
Now, let’s install Mac homebrew for both arch types. The good thing is, by default on i386, the brew installation is on /usr/local/bin/ and on arm64 it goes under /opt/homebrew/bin/ so nothing conflicts. Once they’re both installed, it’s a good idea to reference different packages when different architectures are invoked.
# Multiple Homebrews on Apple Silicon
if [ "$(arch)" = "arm64" ]; then
    eval "$(/opt/homebrew/bin/brew shellenv)"
    export PATH="/opt/homebrew/opt/[email protected]/bin:$PATH"
    # export LDFLAGS="-L/opt/homebrew/opt/[email protected]/lib" # For compilers to find [email protected]
    export PATH="$HOME/.pyenv_arm64/bin:$PATH"
    eval "$(pyenv init --path)"
    eval "$(pyenv init -)"
    eval "$(pyenv virtualenv-init -)"
    export NVM_DIR="$HOME/.nvm"
     [ -s "/opt/homebrew/opt/nvm/nvm.sh" ] && \. "/opt/homebrew/opt/nvm/nvm.sh"  # This loads nvm
     [ -s "/opt/homebrew/opt/nvm/etc/bash_completion.d/nvm" ] && \. "/opt/homebrew/opt/nvm/etc/bash_completion.d/nvm"  # This loads nvm bash_completion
    architecture="arm64"
else
    eval "$(/usr/local/bin/brew shellenv)"
    export PATH="/usr/local/opt/[email protected]/bin:$PATH"
    export PATH="/usr/local/opt/[email protected]/bin:$PATH"
    export PATH="$HOME/.pyenv_i386/bin:$PATH"
    eval "$(pyenv init --path)"
    eval "$(pyenv init -)"
    eval "$(pyenv virtualenv-init -)"
    # export LDFLAGS="-L/usr/local/opt/[email protected]/lib" # For compilers to find [email protected]
    architecture="x86"
fi
Note: I use nvm and pyenv so that is referenced in the excerpt above. Add this to the end of your ~/.zshrc
Step 2
Install esp-idf for x86
Like I mentioned before esp-idf can be built for arm64 but a specific cryptoauthlib library doesn’t have arm64 support yet. So we have to install esp-idf for x86. This guide for tag v4.3.2 is pretty good. Once everything is installed add the alias to the end of ~/.zshrc
alias get_idf='. $HOME/esp/esp-idf/export.sh'
Since the path doesn’t conflict with any x86/arm84 packages and we’re referencing the esp python installation directly, it won’t matter if it’s not in one of the conditional blocks. When you execute get_idf in a new terminal. You’ll find the following
Setting IDF_PATH to '/Users/pronoyc/esp/esp-idf'
Detecting the Python interpreter
Checking "python" ...
Checking "python3" ...
Python 3.8.9
"python3" has been detected
Adding ESP-IDF tools to PATH...
Not using an unsupported version of tool cmake found in PATH: 3.22.1.
Using Python interpreter in /Users/pronoyc/.espressif/python_env/idf4.3_py3.8_env/bin/python
Checking if Python packages are up to date...
Python requirements from /Users/pronoyc/esp/esp-idf/requirements.txt are satisfied.
Updated PATH variable:
  /Users/pronoyc/esp/esp-idf/components/esptool_py/esptool:/Users/pronoyc/esp/esp-idf/components/espcoredump:/Users/pronoyc/esp/esp-idf/components/partition_table:/Users/pronoyc/esp/esp-idf/components/app_update:/Users/pronoyc/.espressif/tools/xtensa-esp32-elf/esp-2021r2-8.4.0/xtensa-esp32-elf/bin:/Users/pronoyc/.espressif/tools/xtensa-esp32s2-elf/esp-2021r2-8.4.0/xtensa-esp32s2-elf/bin:/Users/pronoyc/.espressif/tools/xtensa-esp32s3-elf/esp-2021r2-8.4.0/xtensa-esp32s3-elf/bin:/Users/pronoyc/.espressif/tools/riscv32-esp-elf/esp-2021r2-8.4.0/riscv32-esp-elf/bin:/Users/pronoyc/.espressif/tools/esp32ulp-elf/2.28.51-esp-20191205/esp32ulp-elf-binutils/bin:/Users/pronoyc/.espressif/tools/esp32s2ulp-elf/2.28.51-esp-20191205/esp32s2ulp-elf-binutils/bin:/Users/pronoyc/.espressif/tools/cmake/3.16.4/CMake.app/Contents/bin:/Users/pronoyc/.espressif/tools/openocd-esp32/v0.10.0-esp32-20211111/openocd-esp32/bin:/Users/pronoyc/.espressif/python_env/idf4.3_py3.8_env/bin:/Users/pronoyc/esp/esp-idf/tools:/Users/pronoyc/.nvm/versions/node/v16.13.1/bin:/Users/pronoyc/.pyenv_arm64/plugins/pyenv-virtualenv/shims:/Users/pronoyc/.pyenv/shims:/Users/pronoyc/.pyenv_arm64/bin:/opt/homebrew/opt/[email protected]/bin:/opt/homebrew/bin:/opt/homebrew/sbin:/Users/pronoyc/.rbenv/shims:/Users/pronoyc/.rbenv/bin:/opt/homebrew/bin:/opt/homebrew/sbin:/usr/local/bin:/usr/bin:/bin:/usr/sbin:/sbin:/Users/pronoyc/.cargo/bin
Done! You can now compile ESP-IDF projects.
Go to the project directory and run:

  idf.py build
This output shows you exactly where the Python installation is and what the new Path needs to be to reference app esp dependencies. This will be useful for our IDE build system.
Step 3
Install the Microchip cryptoauthlib library
Install it by referencing the python path directly from the previous output.
/Users/pronoyc/.espressif/python_env/idf4.3_py3.8_env/bin/python -m pip install cryptoauthlib
Verify that it has been installed by executing
/Users/pronoyc/.espressif/python_env/idf4.3_py3.8_env/bin/python -m pip freeze
bitstring==3.1.9
Brotli==1.0.9
certifi==2021.10.8
cffi==1.15.0
charset-normalizer==2.0.9
click==8.0.3
construct==2.10.54
contextlib2==21.6.0
cryptoauthlib==20211006
cryptography==3.4.8
ecdsa==0.17.0
Flask==0.12.5
Flask-Compress==1.10.1
Flask-SocketIO==2.9.6
future==0.18.2
gcovr==5.0
gdbgui==0.13.2.0
gevent==1.5.0
greenlet==1.1.2
idf-component-manager==1.0.0
idna==3.3
itsdangerous==2.0.1
Jinja2==3.0.3
kconfiglib==13.7.1
lxml==4.7.1
MarkupSafe==2.0.1
psutil==5.8.0
pycparser==2.21
pyelftools==0.27
pygdbmi==0.9.0.2
Pygments==2.10.0
pyparsing==2.3.1
pyserial==3.5
python-engineio==3.14.2
python-socketio==4.6.1
PyYAML==6.0
reedsolo==1.5.4
requests==2.26.0
requests-toolbelt==0.9.1
schema==0.7.5
semantic-version==2.8.5
six==1.16.0
tqdm==4.62.3
urllib3==1.26.7
websocket-client==1.2.3
Werkzeug==0.16.1
xmlrunner==1.7.7
Excellent,it’s installed.
Step 4
Setup CLion profile
Esp-IDF comes with project templates. You can just copy a project and then open it in CLion.
The important thing to do here is to setup the environment variables in Preferences > Build, Execution, Deployment > CMake > Environment Variables
Get the required variables from the output from step 2. We’re insterested in the Python path and the updated PATH variable. Copy both and set them in the environment variables.
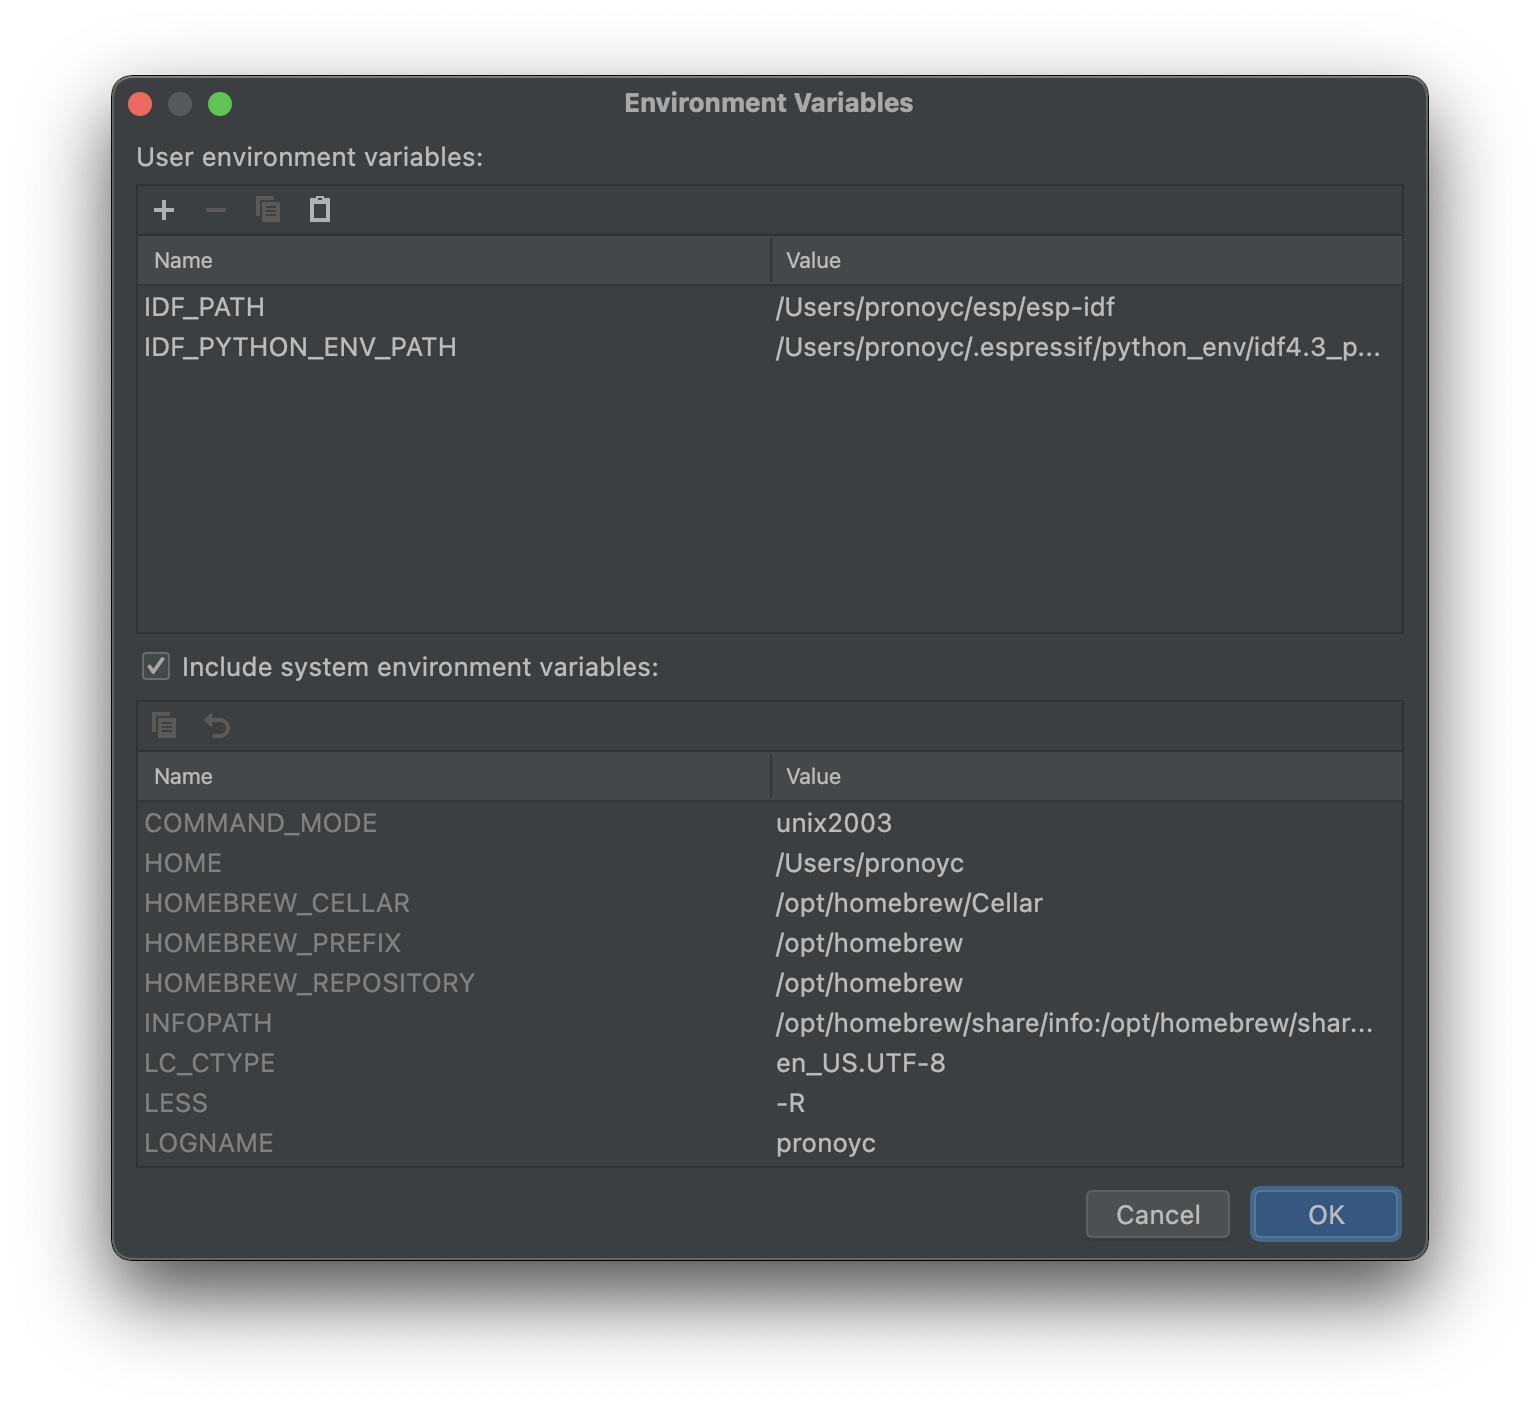
CMake should build without errors after this.
Step 4
This is still in progress. I need to know how to add the core2aws component to the build system. I have opened a question on the edukit dicussion forum. I’ll update the post with further steps but hopefully this should just work with other ESP32 boards directly.